Tip of the week : How to Create Text Files from SAP Studio Queries
A step-by-step guide to exporting SAP data directly as text files using Precisely Automate Studio.
Overview
When extracting data from SAP, you may need the results in a text format for downstream consumption. There are two common approaches:
• Export to Excel first, then manually save the file as a CSV or text file.
• Create a text file directly from a Studio Query and save it straight to the target directory - no manual conversion needed.
This guide walks through the second, more efficient approach using Precisely Automate Studio.
Prerequisites
• Access to Precisely Automate Studio with query permissions.
• Knowledge of the SAP tables and fields relevant to your data extract.
• Permission to access the relevant tables
• Write access to the destination directory where the text file will be saved.
Step 1: Open Automate Studio and Select Query
Launch Precisely Automate Studio. On the New script screen, you will see the available script types: Transaction, Query, Direct, Fiori, and GUI for HTML. Click Query to begin.
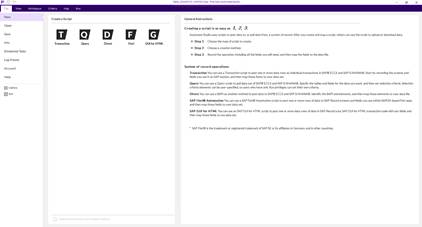
Figure 1 – Automate Studio home screen showing script type options.
Step 2: Choose the Creation Method
After selecting Query, you are prompted to choose a creation method. In this example, we will elect Create from Tables to manually pick the SAP tables and fields you need for your extract. The other methods will also work.
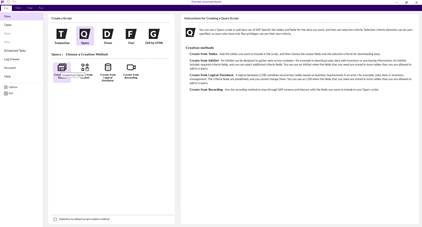
Figure 2 – Query creation method selection; choose 'Create from Tables'.
Step 3: Connect and Select the Text Data Type
Automate Studio will confirm your SAP connection (system, user, and status). Under Data type, open the dropdown and select Text instead of Excel or Access. Then click Create Script to proceed.
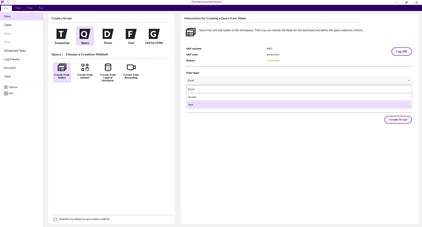
Figure 3 – Data type dropdown with 'Text' selected - this ensures the output is a text file rather than Excel.
Step 4: Select the Tables and Fields to Extract
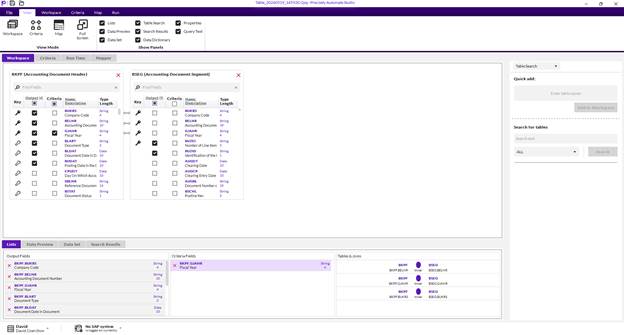
Figure 4 – Table and field selection screen in Automate Studio.
Step 5: Define Criteria - Enter Values or Link a File
Once your tables and fields are selected, configure your selection criteria. You can either type values directly into the criteria fields, or use a dynamic list linked to a text or Excel file for reusable, automated runs.
To link a criteria file, open the List Builder for the relevant field (e.g. GJAHR) and select Dynamic Lookup List, then choose Linked Excel or Text File.
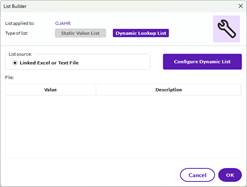
Figure 5 – List Builder dialog: select 'Dynamic Lookup List' and link to an external text file.
Step 6: Select the Criteria Text File
A file browser will open. Navigate to the folder containing your criteria file. Change the file type filter at the bottom to Text Files (.txt) to locate your file, then select it and confirm.

Figure 6 – File browser showing the Data folder; filter set to 'Text Files (.txt)' to find the criteria file.
Step 7: Configure the Dynamic List Settings
The Create dynamic list from linked file dialog allows you to configure how the criteria file is read:
• File name and path: Confirm the path to your criteria text file.
• Separators: Set the item separator (e.g. Semicolon) and row separator (NewLine).
• Import rows: Define the range of rows to import (e.g. From 1 through End).
• Trim Spaces: Check both 'Trim leading spaces' and 'Trim trailing spaces' to clean the values.
Click OK to apply the settings. The criteria values from the file will be loaded into the query.
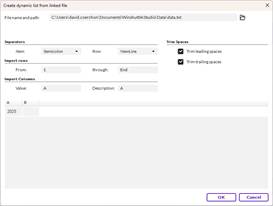
Figure 7 – Dynamic list configuration dialog with separator, row range, and trim settings.
Step 8: Configure the Output Delimiters
Figure 8 – Output delimiter options for the text file.
● This is where you can choose the kind of separators your file will use. Note that the output file will always have a .txt extension.
Step 9: Run the Query and Verify the Output
1. Save the script, then click Run to execute the query.
2. Navigate to the destination directory and confirm that the text file has been created.
3. Open the file to verify the data is correctly formatted and all expected records are present.
4. If the output is missing or incorrect, revisit your criteria settings and output path.
Tips & Best Practices
• Numbers are formatted according to your regional settings (US uses "," as the thousands separator; EU uses a space). Depending on your downstream requirements, you may need to update the number format in the result file.
• Use criteria files for automation: A linked text file allows the same query to run with different parameters - ideal for batch or scheduled jobs.
• Name output files clearly: Include a date or timestamp in the filename to avoid overwriting previous extracts.
• Check permissions: Ensure your account has write access to the destination directory before running.
------------------------------
David Coerchon
Senior Sales Engineer
*Precisely Software Inc.
------------------------------