In this week's #MapInfoMonday tip, I'll dive into the usage of Drivetime Zones.
Drivetime Zones are used across multiple verticals from Retail, over Utilities to Emergency Services. They are used to calculate the area you can reach within a given amount of time or distance. Within Retail, it's often used to calculate the estimated area that a retail location is expected to have customers visit from; Within Emergency Services, it's used to estimate the coverage of one or fire stations to be able to analyze how big part of a population can be reached within a given time.
In MapInfo Pro, you can calculate drivetime zones using the MapInfo RouteFinder add-in and a road network dataset. This will give you a lot of other features and will also allow you to modify the route network by adding for example roadworks.
But a more simplistic but still very powerful way to calculate drivetime zones is relying on the Precisely API for drivetime zones. It's simple because you can't modify the road network. On the other hand, you don't need to worry about updating the road network because that's handled by our API team. You still get access to road speed at different times of the day; "AM Peak", "PM Peak", "Off Peak", and more.
As input, you need a table of points for which you want to calculate the drivetime zones. It can also take some selected points as input.
The use of Drivetime Zones in MapInfo Pro requires credits. While you are on maintenance you get 2000 credits each month. All you need to do is to create an account and log into it from within MapInfo Pro.
Let's get our hands dirty.
Your Account
On the Backstage (the Pro tab) under Services, you can access your account page and see the current status of your credits. If you haven't an account, this is also where you can create one.
When you have created your account, and you have logged into your account from the backstage, you can see the state of your account on the backstage. You can see how many credits you have left, and when the next quota starts. If you need more than 2000 credits a month, you can upgrade your account to get more credits.
Creating Drivetime Zones
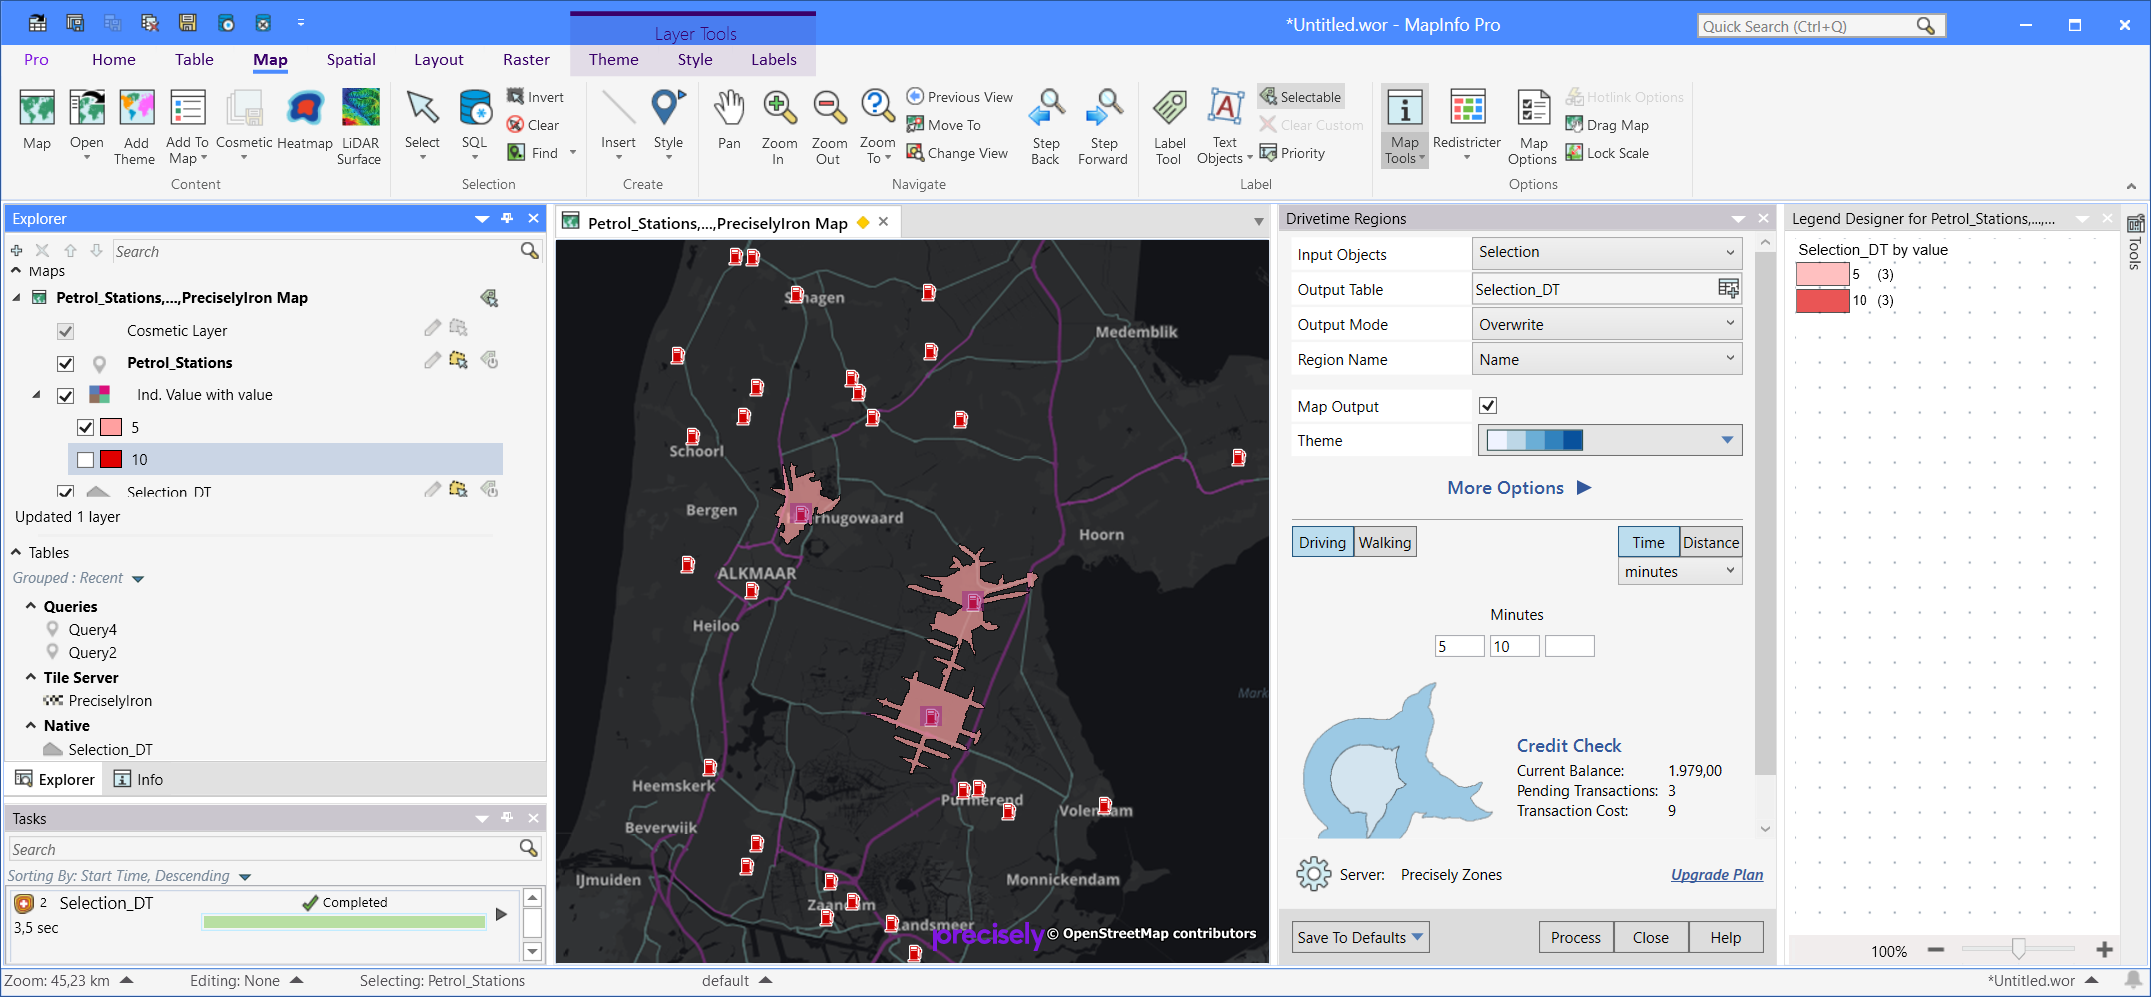
You access the Drivetime Zone tool (also known as Drive Regions or Drivetime Regions) on the Spatial tab under Regions. It will get loaded into a docked window.
In this example, we'll create a 5 and a 10-minute drivetime zone around three selected Petrol Stations. To do this, we first select the three petrol stations with the Select tool. You can use anyway in MapInfo Pro to select the points you want to use. The Drivetime Regions tool supports the Selection as input.
In the Drivetime Regions window, you select the Selection as your input, you need to specify the output table which by default uses the name of the input table and adds "_DT" to the filename.
If the output file exists, you can either overwrite it or add the drivetime regions to the existing table.
You need to select a column holding a value that will identify the drivetime regions such as a name or an ID. Under More Options, you specify an additional three columns that you want to bring over into the drivetime regions table.
Now you need to specify the settings for the drivetime regions. You can create Driving or Walking regions, and you can specify their size by either Time or Distance. Finally, you can enter up to three sizes of drive regions that you want to be created.
Under More Options, you are able to control the settings for the regions. These settings control the result, that you'll end up with. Below you can see the options I have used to create my drivetime zones.
One important setting is whether you want to use historic traffic data to control the speed you can drive on the road segments.
When you are ready to proceed, press the Process button to start the calculation. The process runs in the background and lets you continue to use MapInfo Pro. You can view the status of the calculation in the Task window.
The resulting drivetime zones might overlap each other so it is advisable to create a thematic map for the zones, either using the value column - the time in this case - or using the Name column, the individual petrol stations. In this way, you can use the Explorer window to turn on and off the individual zones to get a better view of the coverage. In the example below, I have turned off the visibility of the bigger 10-minute drivetime zones.
The resulting drivetime zones are vector polygons which will let you use these to select other points or to calculate statistics based on the overlap of for example a set of demographic data to estimate if you are reaching the expected amount of people. That's a story for another post.
Are you already using the Drivetime Zones option in MapInfo Pro?
#MapInfoMonday is your weekly little tip to help you get more from your MapInfo Pro.
------------------------------
Peter Horsbøll Møller
Principal Presales Consultant | Distinguished Engineer
Precisely | Trust in Data
------------------------------