Over the coming weeks, I'll write a #series of articles about the #SQL improvements we have made in MapInfo Pro v2019. This will, of course, look at the Select statement, we will get there eventually, but I'll also dive into the other improvements.
In this article, we'll dive into another of the improvements we made to the user interface: The new SQL Window.
The new SQL Window
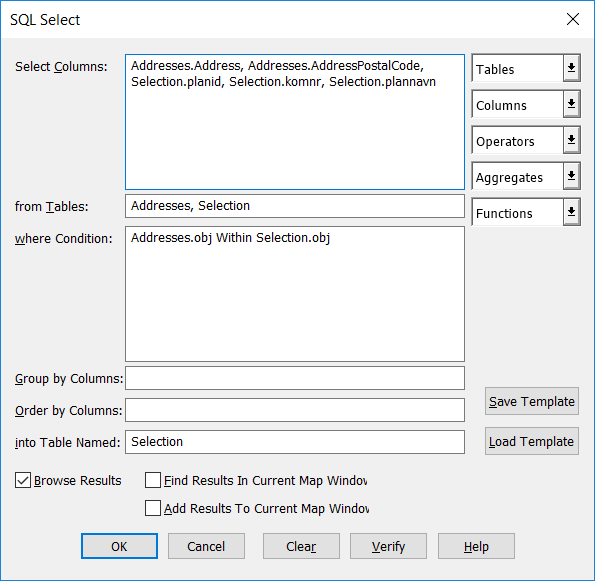
We have over the years received a lot of feedback on the classic SQL Select dialog. We have also improved it slightly once in a while but we never did a radical new design. It's also worth adding that we also have had users tell not to completely replace the existing dialog as they have become quite used to it.
In case you wonder, the image below shows the classic SQL Select dialog.
The new SQL Window is aimed at the users that kind of know their way around the SQL language but it can also be used to get familiar with the SQL language. Any SQL statement, be that a Select, Insert, Update or Delete statement, created using the interface or basically just executed in MapInfo Pro can be loaded into the SQL Window.
In this article, we will look at the features of the SQL Window and how they can help you when using the window to build statements.
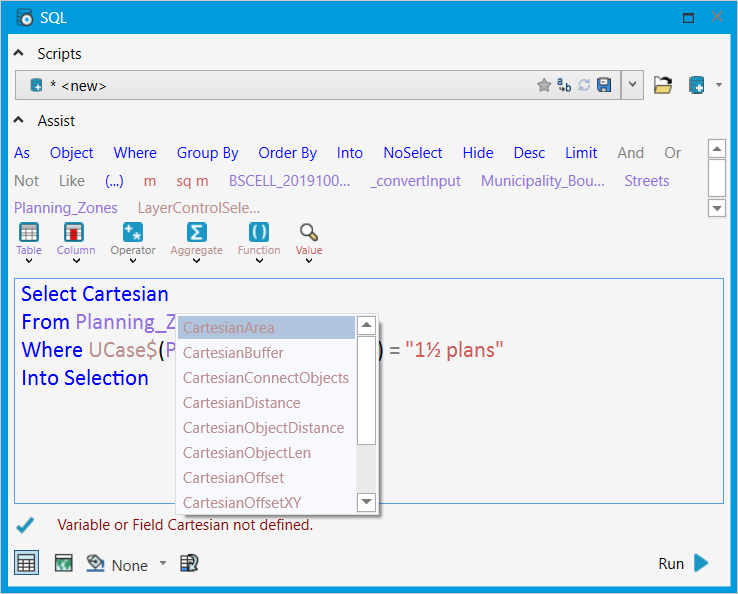
We can divide the SQL Window into four areas and then focus on one of these at a time
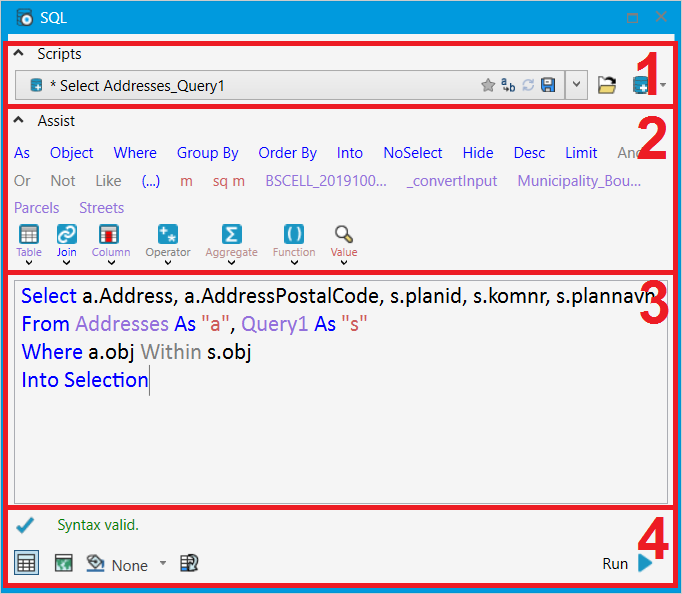
- The Scripts area
- The Assist area
- The Script Editor
- The Output area
1. The Scripts area
At the top of the SQL Window, you find the Scripts dropdown with the most recent and your favorite scripts.
At the top of the Scripts dropdown, you have a search field that lets you search for a specific script. The search doesn't only look at the name but also at the content of the scripts.
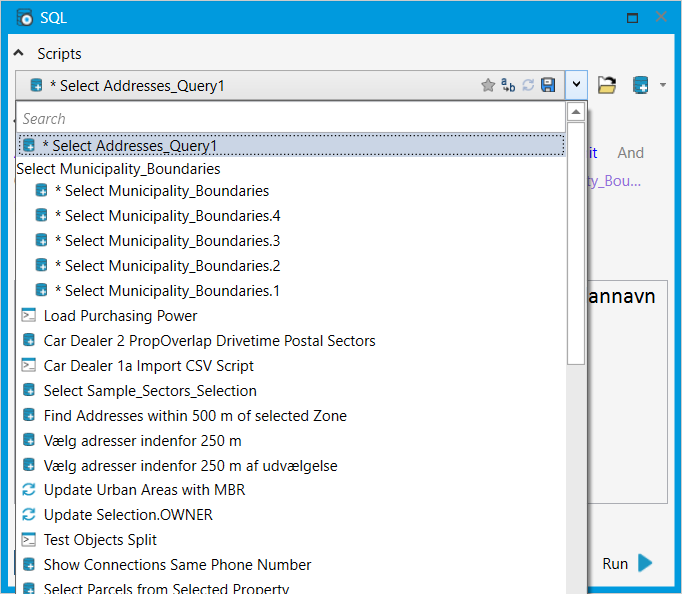
The SQL Window keeps track of your scripts for you. For each change you make to a script that already has been executed, it creates a new version of that script. You can see identify these as they have been postfixed with ".1", ".2", ".3" and so on. You can also see that they are grouped together in the Scripts dropdown.
On the right side in the Script dropdown, you have controls for:
- Making your script a favorite which adds it to the Favorites list in the SQL dropdown on the TABLE, MAP and SPATIAL tabs. This gives you easy access to the scripts that you often use.
- Renaming the script. You can give your script a name that makes it clear what it does and so makes it easier for you to find the script later.
- Reload Saved Script. This creates a copy of the current content in the Script Editor and then loads the script from the file on disk.
- Save Script. This saves the script to a file on disk in the folder for Saved Scripts which can be set using the Directories preferences.
If you want to delete a script from the list, you can do this from the
Scripts dropdown too. You can however not delete the currently selected script. In the image below, you can see the Delete option that appears next to a script when you hold your mouse on the script in the
Scripts dropdown.
Next to the dropdown list, you have the Open Saved Script button that lets you open a script from anywhere on your computer into the Statement area.
On the far right side, you have the Create New Script dropdown that you can use to create a new script of a specific type. You can choose between one of the four SQL statement types, Select, Insert, Update or Delete, and the new and more generic Script type. Depending on which you pick, the Script Editor will get updated with the standard elements of the statement matching the selected type.
2. The Assist area
The Assist area is designed to help you build your statements and scripts. At the top of the Assist area, you will find the Recent Items, a list of commonly used words in the current script type. You will also see a list of recently opened tables and the words that you most recently have used.
You can insert any of these words into the Script Editor simply by clicking on the word. The word will get inserted where the cursor currently is positioned in the Script Editor.
You can also delete words from this area using the small X that appears when you hover your mouse over the word.
And you can add your own words to the list by right-clicking on the word in the Script Editor and selecting Add to Recent Items.
You can also right-click in the Assist area and get access to a few options. The context menu lets you clear the Recent Items completely, hide the Recent Items and finally restore the Recent Items to the default values.
Below the Recent Items, you find a number of dropdowns. These can be used to insert specific elements into the Script Editor. These are the dropdowns:
Table.
A list of the currently open tables that can be used in your script/statement. The list contains a search field at the top. You can also access the dropdown using Ctrl+Shift+T. Single click keeps the dropdown open and double-click closes the dropdown.
Join.
This dropdown will only appear when you have two tables in the From part of your Select statement. It contains a not complete list of possible join options matching the tables in the From part. You can also access the dropdown using Ctrl+Shift+J.
Column.
This dropdown contains a list of columns from the tables in your script. The list has a search field at the top. Access the dropdown using Ctrl-Shift+C. Single click keeps the dropdown open and double-click closes the dropdown.
Operators.
This contains a list of all operators including the spatial operators. You can access the dropdown using Ctrl+Shift+O.
Aggregate.
In this dropdown, you will find the numeric aggregates and the new spatial aggregates that typically are used in combination with Group By. You can access the dropdown using Ctrl+Shift+A.
Function.
This is a complete list of all available MapBasic functions. This also includes the functions that might have been published by currently running MapBasic applications. The list has a search field at the top and you can access the dropdown using Ctrl+Shift+F
Value.
This dropdown can help you identify unique values in a specific column. It's mostly used when you type in a condition like "SomeColumn =". Now you use the Value dropdown to see unique values in the column "SomeColumn".
The dropdown also has a search field at the top to help you limit the list of values.
MapInfo Pro only searches through the values in the column for a few seconds to get a list of the values. You can use the Refresh button to extend the search. For each time you click on the Refresh button, the search will search longer and longer.
You can influence the value used in the Value dropdown by selecting the expression to use. At the top of the Value dropdown, you can see the column or expression that currently is used.
A single-click will keep the dropdown open and a double-click will close it. Quotes will be added automatically to the value inserted if it's a text string. You can use Ctrl+Shift+V to access the dropdown.
Not all of the dropdowns are available for all the different script types.
3. The Script Editor
The Script Editor is where you type in your statement or script to execute. As you may have figured from the text above this isn't just a replacement for the classic SQL Select dialog. It's much more as you can use it to write and execute any SQL statement and even write small MapBasic scripts that you can save and execute when needed.
The Script Editor is a feature-rich text editor with support for syntax highlighting and syntax validation. The syntax highlighting adds different colors to different keywords such as tables, columns, functions, and operators.
You can also use IntelliSense to get tips when writing your statement. You activate IntelliSense using Ctrl+Space. You will now see a list of options matching the word you currently have started writing.
You can also use the different elements within the Assist area to fill in table and column names, functions and operators. Position the cursor where you want the text inserted and select it from the dropdown or the Recent Items. Also, remember that some of the dropdowns now let you select multiple values before the dropdown closes.
The Script Editor also has a small context menu with some handy features such as adding the selected text to the Recent Items and Formating the text in the Script Editor. It also here you can turn on/off the automatic syntax check.
4. The Output area
At the bottom of the SQL Window, you can control how you want the result presented. The options here depend on the type of script you are working on. Below you can see the options for a Select script.
At the top of the Output area, you can see the Script Message area. It will tell you if the syntax is valid or if there are some syntax issues with the script. This text is updated when you have entered some text in the Script Editor and you pause for a few seconds.
When you execute a statement, you can also see results from the script and executing times in the Script Message area.
Under the Script Message area, you can see the different output options that have been slightly improved from the earlier versions of MapInfo Pro.
You can select to see the result in a Browser window and/or in a Map window.
If you select the Map option, you can also set an override for the layer that is added to the map. This can either be a fixed color, which you pick using the Color dropdown or you can choose Rotate automatic color which will assign different colors to the result for each time you run your script. That can be useful if you, for example, want to run your Select statement multiple times but query out different records each time.
Finally, you can also check the option to Find Script Result in Map or Browser Windows. This can pan, and zoom, to the result set of the script. Whether you zoom or not, is controlled by the preference for Zoom on Find Selection that you find under Map Preference, Editing.
I hope you are still hanging on as this has been a long article. Hopefully, this article has given you some insight into the new SQL Window and how you can take advantage of it. I would love to hear from you if you already have gained some experience using this new window. So please share your thoughts and if you have ideas about how we can improve the window even further those ideas would be most welcome too.
And I promise, next week we will dive into some of the improvement to the SQL Select syntax that I'm sure you all have been waiting to hear more about. Right?
------------------------------
Peter Horsbøll Møller
Distinguished Engineer
Pitney Bowes Software & Data
------------------------------